First run
This walks one session end to end: start the server, see what loads, sign in, connect a cluster, browse a kind, open the detail drawer. It assumes you have already built the jar — see Installation.
1. Start it
scripts/dev-run.shThat builds if the jar is older than the sources, starts on :8080 with the login
admin/admin, and waits for /actuator/health before it reports success. Those are
development credentials passed as environment at run time.
By hand, the equivalent is:
KWEBLENS_SECURITY_ADMIN_USERNAME=admin \
KWEBLENS_SECURITY_ADMIN_PASSWORD='<a password you chose>' \
java -jar kweblens-web/target/kweblens.jar
If you leave the password unset, the app generates one at startup and logs it at WARN.
That is by design — there is no default password — but it means the login changes every run
and you have to read it out of the log.
Open http://localhost:8080/.
2. No cluster? Use the simulator
The simulator is an in-JVM generated cluster. Nothing real is contacted, and the objects it generates are sized and shaped like measured live ones, so the UI behaves the way it does against a real cluster.
scripts/dev-run.sh --sim

# or, by hand
KWEBLENS_SIMULATOR_ENABLED=true \
KWEBLENS_LOAD_KUBECONFIG=false \
KWEBLENS_SIMULATOR_SIZE=200 \
java -jar kweblens-web/target/kweblens.jar
KWEBLENS_LOAD_KUBECONFIG=false is the important half: it stops the ambient kubeconfig from
being loaded, so the generated cluster — registered under the id sim, display name
Simulator — is the only one. KWEBLENS_SIMULATOR_SIZE is objects per kind (ConfigMap,
Secret, Pod, ReplicaSet, Deployment, Service, Endpoints, Ingress); KWEBLENS_SIMULATOR_NAMESPACES
(default 3) spreads them across namespaces. A realistic minority of objects are seeded
unhealthy — crash-looping and unschedulable pods, Services with no Endpoints, a NotReady
node, Warning events — so the overviews and health checks have something to say.
The simulator holds every generated object in the same JVM, so large sizes cost real memory. See Performance and scale before turning it up.
3. Signing in
kweblens starts in open mode: GET endpoints are public, so the dashboard loads and shows
you the cluster without any login. Every non-GET — apply, patch, exec, port-forward, Helm,
adding a cluster — requires the admin login, and a few read paths do too (pod exec, Helm
values, the whole pod file browser), because what they return is itself a secret.
Use Sign in at the right of the brand bar. Credentials are held in memory for that browser tab only and sent over HTTP Basic; a reload signs you out. The sign-in also establishes a session cookie, which is what lets the exec terminal open its WebSocket — a browser cannot attach Basic auth to a WebSocket handshake.
If you are not signed in, a write control does not fail silently: it opens the sign-in dialog instead.
|
There is one shared admin account. kweblens acts with its own cluster credentials, not
yours, and does not check whether you are allowed to do something — see
Security and identity and ADR-001. Set
|
4. What is on screen
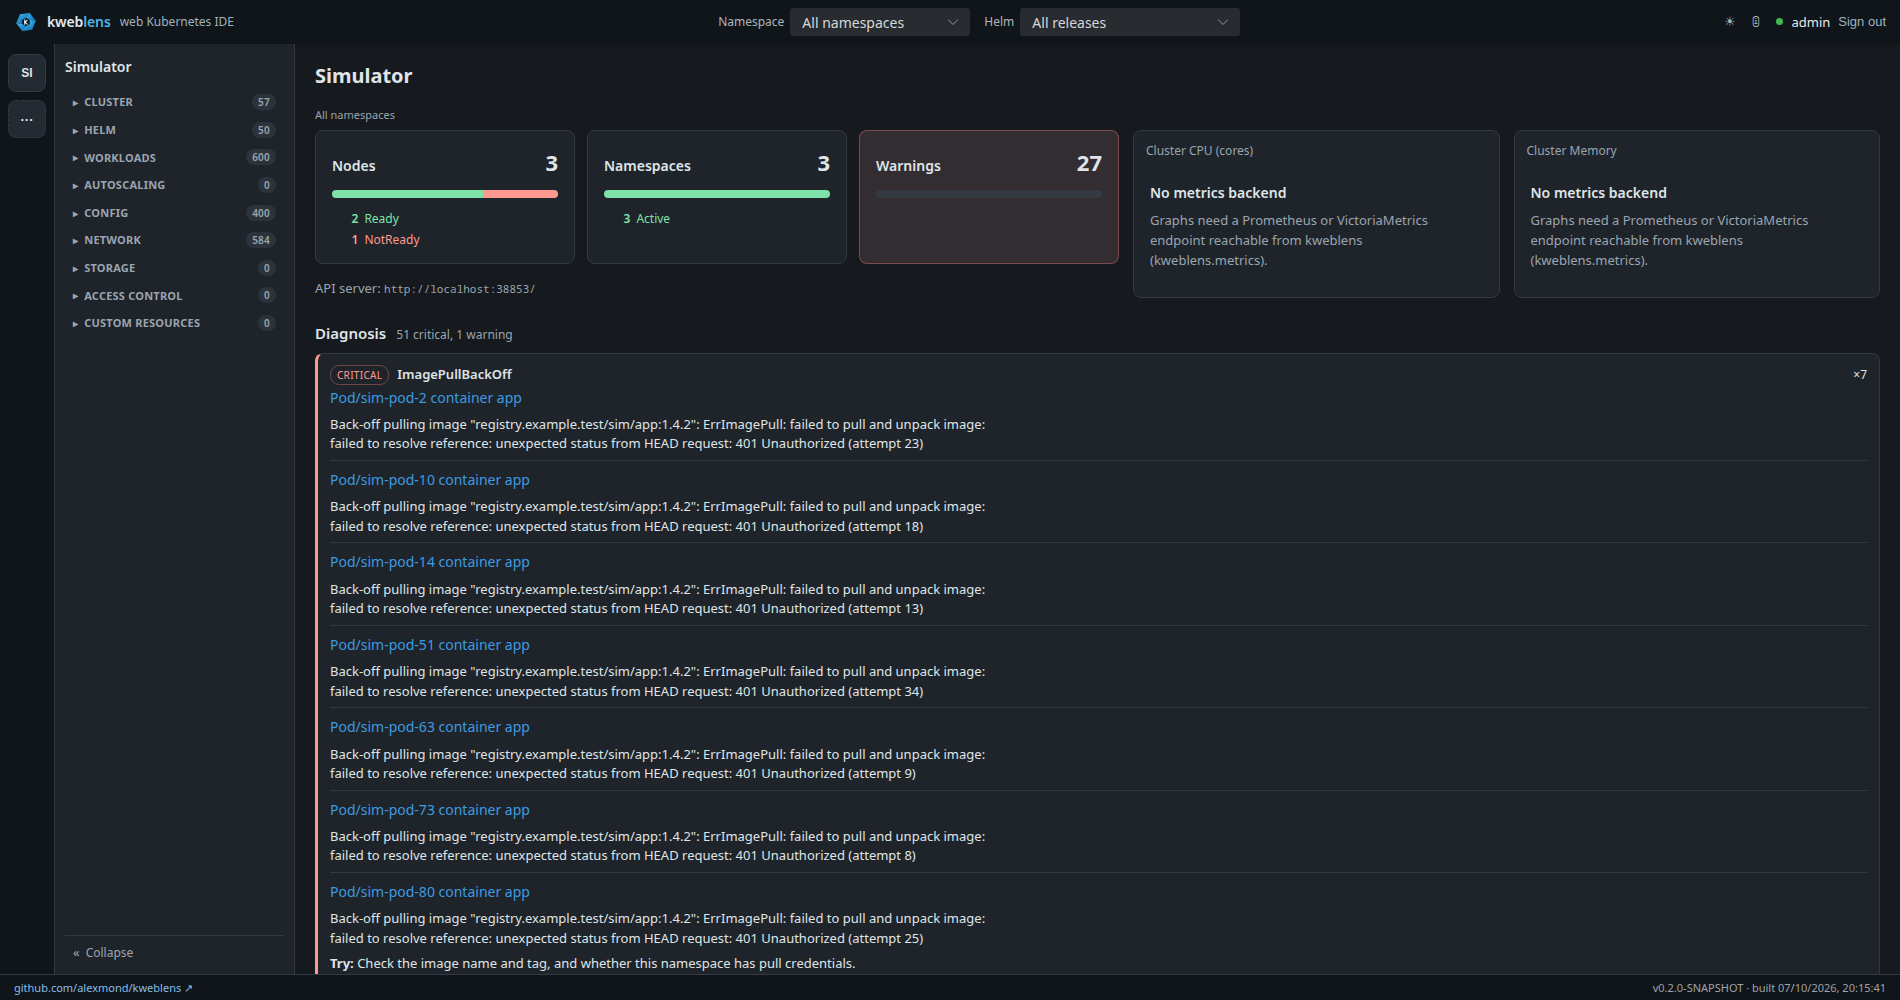
The UI is one page — there are no per-view URLs to bookmark.
-
Brand bar, across the top: the namespace selector, a Helm-release filter that scopes the lists to one release’s resources, a diagnostics button (detected capabilities and effective config), the light/dark toggle, and sign in / sign out.
-
Cluster rail, the narrow strip on the left: one tile per cluster, capped, ending in an All clusters button that opens the Clusters page. The cluster you are viewing is always shown even if it sorts past the cap.
-
Navigation tree, beside the rail: the categories and kinds for the selected cluster, with object counts, favourites, and a Custom Resources section generated from the cluster’s own CRDs. Helm (Releases, Charts, Repositories) and Port Forwards live here too.
-
Main pane: the cluster Overview to begin with — the objects needing attention are named, not only counted, and clicking one takes you to the filtered list.
Ctrl/⌘-K opens the command palette to switch cluster or jump to a kind.
5. Connect a cluster
On startup kweblens registers one cluster per context in your kubeconfig, using the context name as the cluster id. A laptop kubeconfig with six contexts gives you six clusters in the rail. Nothing connects until you click one — building a client only resolves config.
If the rail is empty, or you want to add a cluster kweblens did not find:
-
Open the Clusters page from the bottom of the rail. It renders even when no cluster exists — it is the page that adds one.
-
Sign in if you have not (adding a cluster is a write).
-
Add cluster, then fill in:
-
Id — lowercase letters, digits,
.,_or-, starting with a letter or digit, up to 63 characters. It becomes a URL segment, a filename and a Secret name suffix. -
Name — the display name; defaults to the id.
-
Kubeconfig — paste the YAML. Use Read contexts to list the contexts in it; the server parses and discards the document, storing nothing.
-
Context — which context to select. A single-context kubeconfig picks itself.
-
-
Save. The kubeconfig is validated structurally, then persisted, then registered — in that order, so a rejected kubeconfig leaves everything exactly as it was.
Because a runtime-supplied kubeconfig has no file it came from, relative certificate paths inside it cannot be resolved: embed the credentials.
Clusters that came from configuration or the ambient kubeconfig are shown as read-only on that page, with the reason stated — editing them there would be undone by the next restart. The full picture is in Connecting clusters.
6. Browse a kind
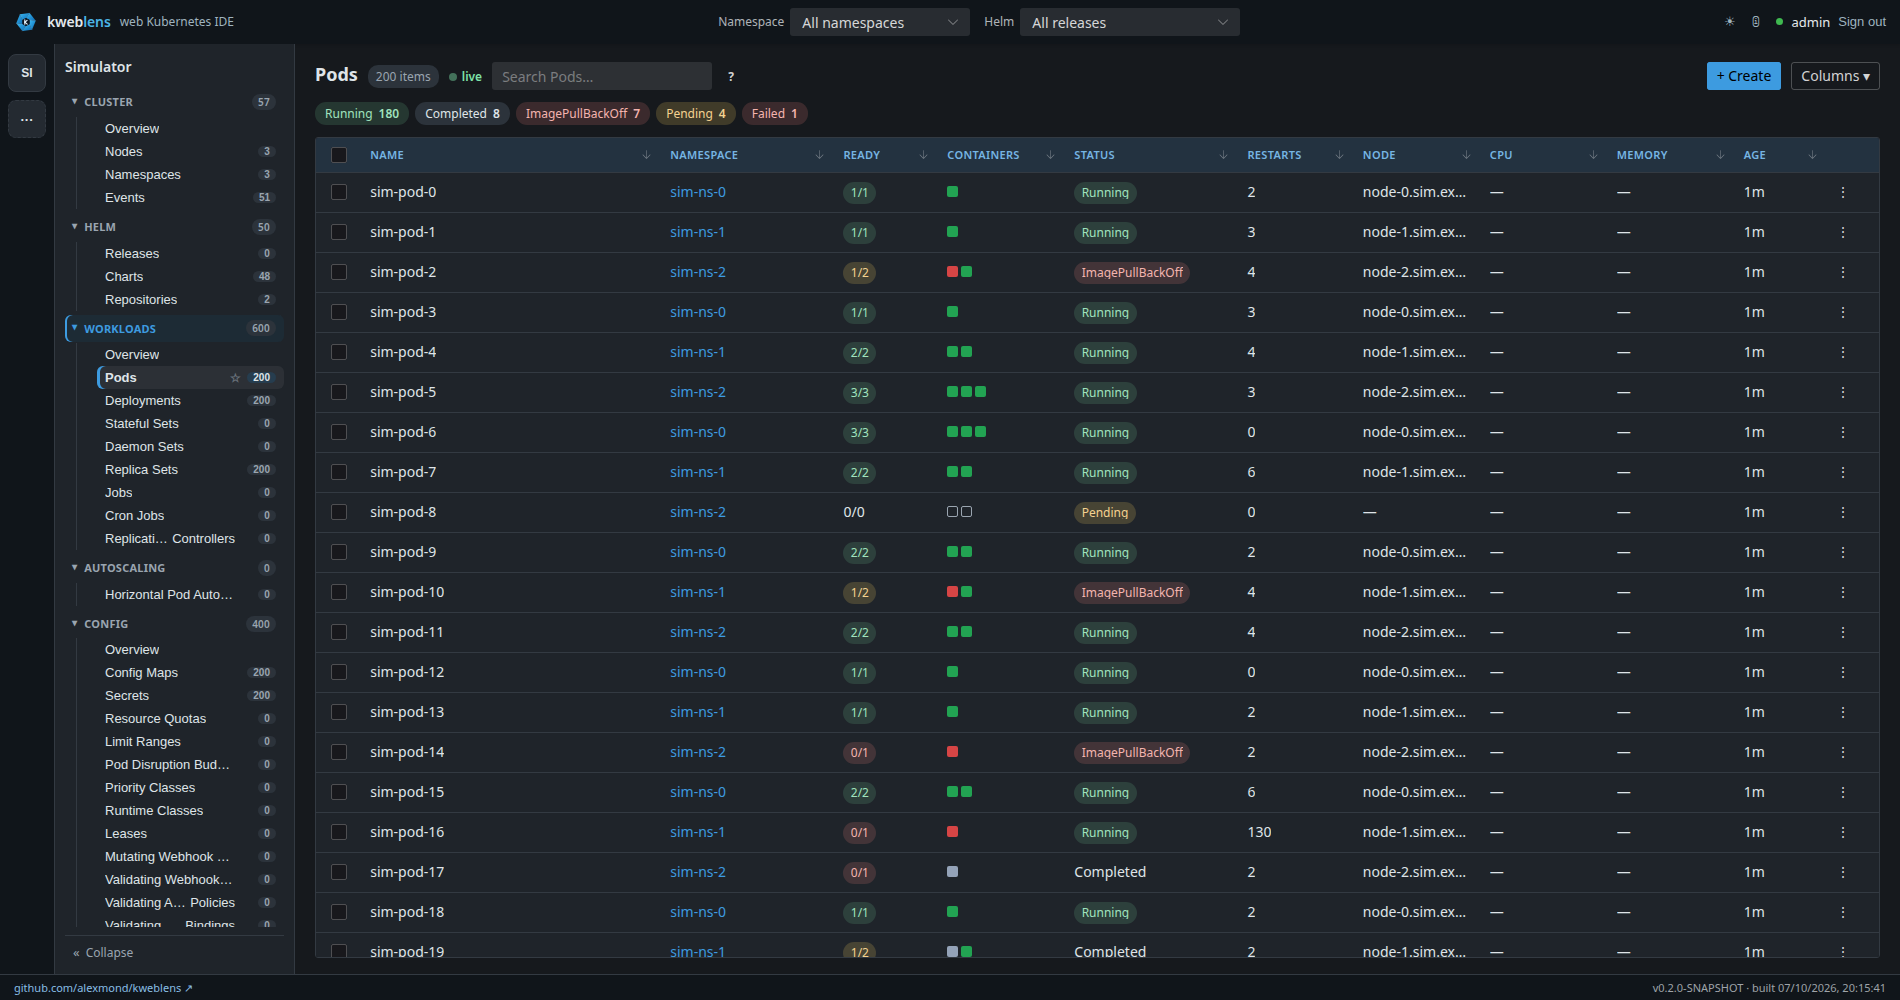
Pick a cluster tile, then a kind in the nav — Workloads → Pods is the usual first stop.
-
The list is live. It is fetched once and then kept current from a Kubernetes watch streamed over SSE, batched per animation frame so a burst of events cannot freeze the tab.
-
The namespace selector in the brand bar scopes namespaced kinds.
-
The search box filters on name, namespace and kind.
-
Columns come from the kind (and, for custom resources, from the CRD’s own printer columns). The column picker says which columns you hid and which the window width hid for you.
-
Row actions and bulk delete are on each row and on the selection; they need the login.
A list row is not the whole object. managedFields is stripped from every list payload, and
ConfigMap/Secret data is sent as keys with null values, which the table renders as — —
"we did not send it", not "it is empty". Opening a row refetches the full object.
7. Open the detail drawer
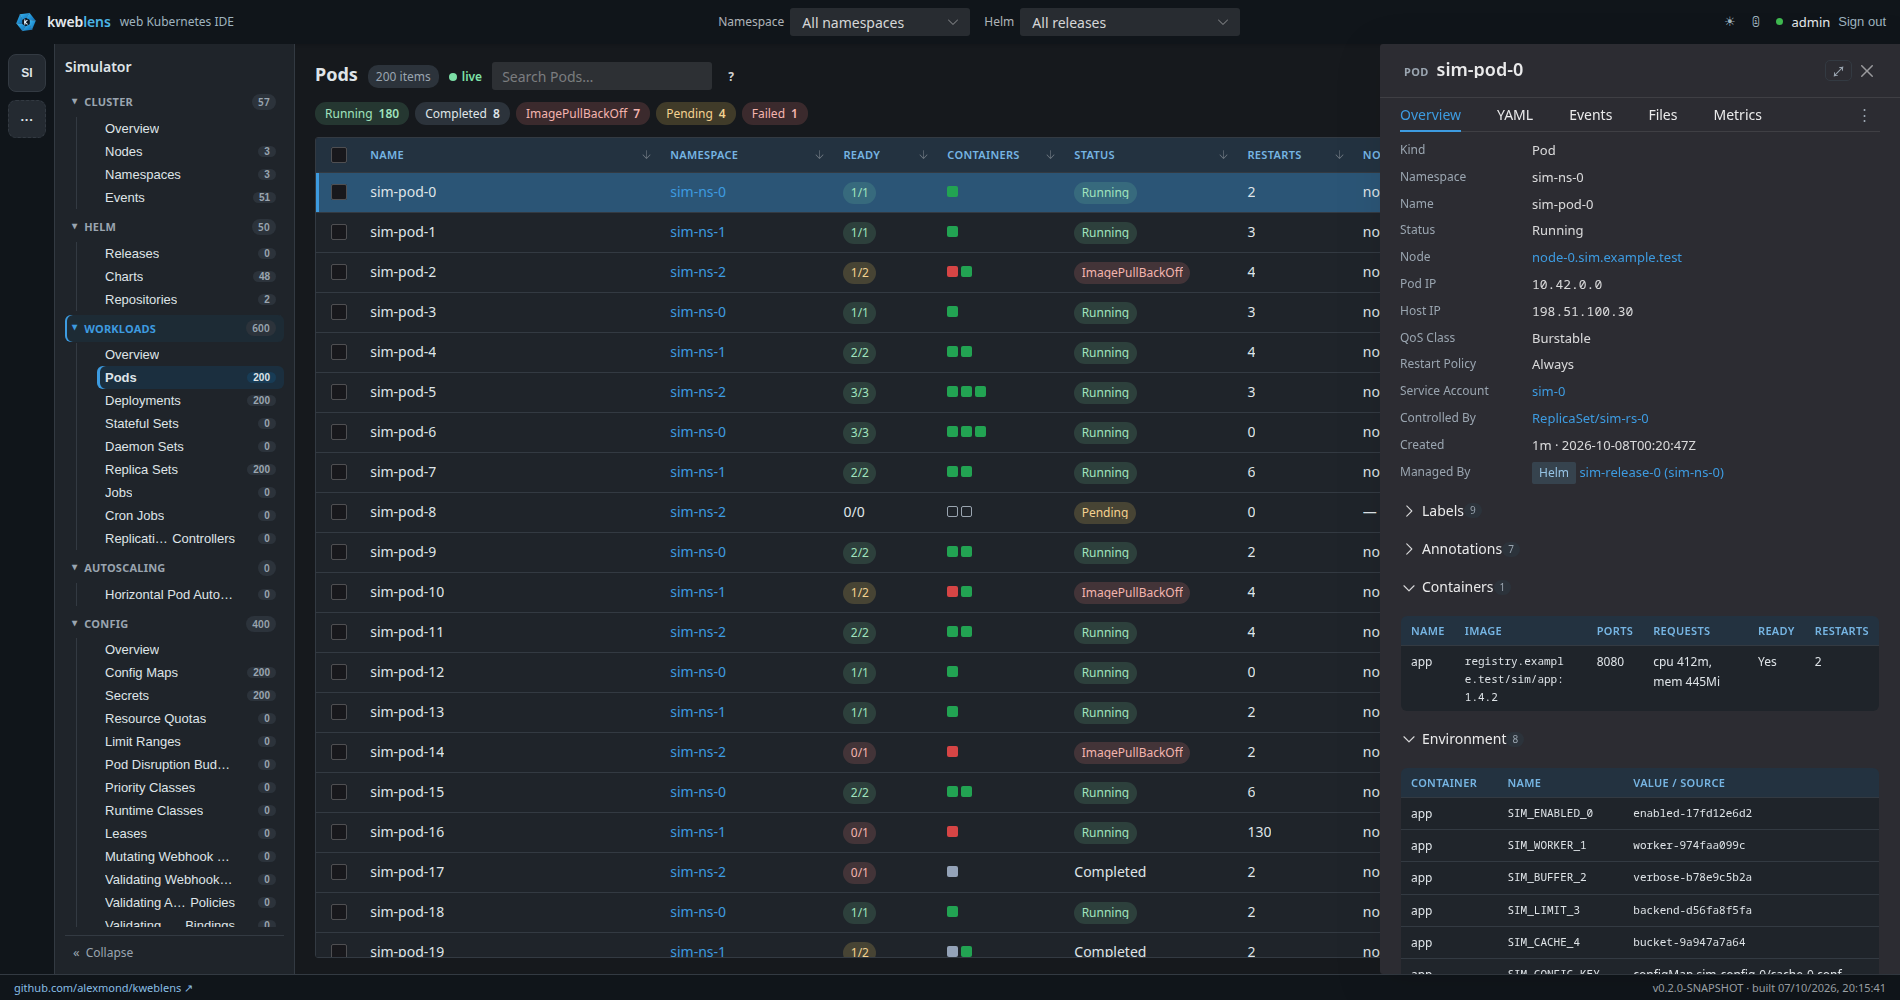
Controlled By and Service Account are server-resolved relations, not links kweblens guessedClick a row. The drawer slides in from the right with:
-
Overview — per-kind detail from a server-side endpoint, plus relation sections resolved server-side where they apply: what owns the object and what it owns, a Service’s endpoints and the pods it selects, which pods mount a ConfigMap or Secret, PVC↔PV binding both ways, a pod’s ServiceAccount and the RoleBindings granting it, HPAs and PodDisruptionBudgets.
-
YAML — the object’s manifest. Editing opens a pop-out editor with four tabs: Editor (CodeMirror, with completion and validation driven by the cluster’s own OpenAPI v3 schema), Form (a key/value editor generated from that schema, synced to the YAML), Warnings (the linter’s findings, with a count) and Review Changes — two diffs, your edit against what was loaded and the live object against what a server
dryRun=Allsays the cluster would actually store, so defaulting, another manager’s fields and an admission refusal all surface before the write. -
Events — the object’s events, loaded when you first open the tab.
-
Metrics — for pods and nodes.
-
Pods — for nodes.
-
Files — for pods, only when the pod file browser is switched on (
kweblens.files.enabled, off by default).
Logs and a terminal open into the dock at the bottom of the window, which can hold several tabs and be popped out into a floating frame.
8. Next
-
Connecting clusters — where clusters come from, and what is editable
-
Configuration — every
kweblens.*property -
Security and identity — required reading before exposing it